Published December 10, 2021 12:21PM
Here's Everything You Need to Know to Build the Cutest DIY Vegan Gingerbread House Ever
From gingerbread blueprints to vegan royal icing, making your own plant-based chalet is easier than you probably think
(Photo: Jen Gotch)
Note: This vegan gingerbread house DIY was originally published in the November/December 2010 issue of Vegetarian Times.
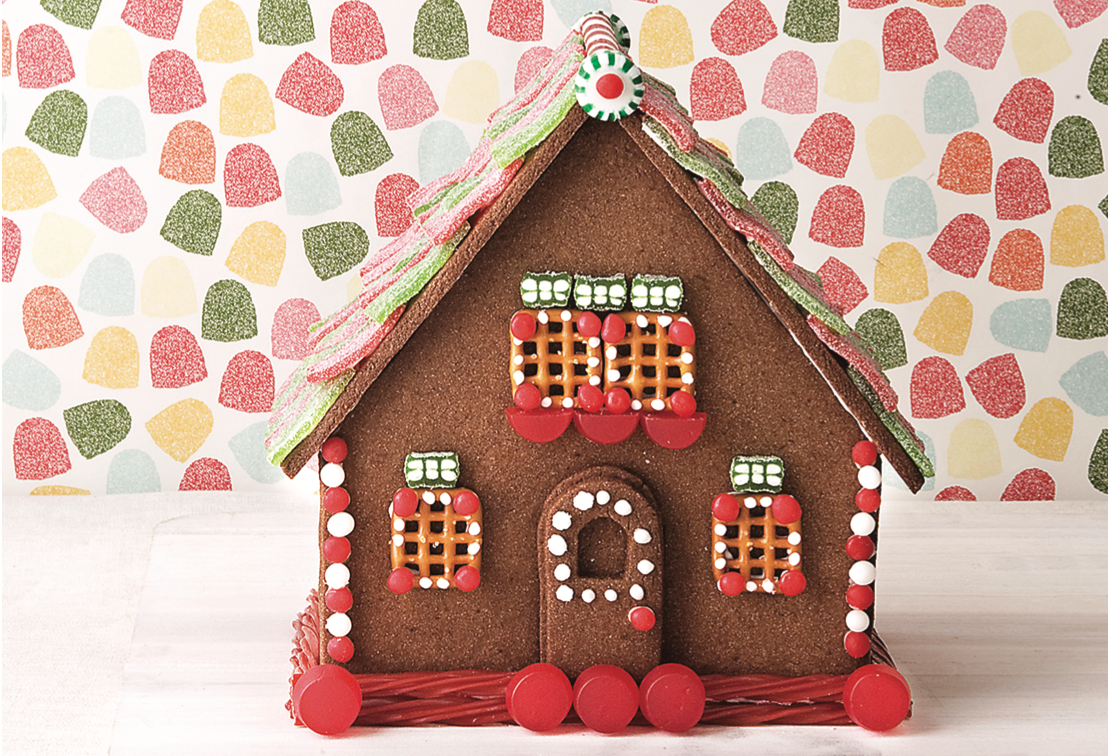
Here’s a holiday project for young and young-at-heart bakers: a vegan gingerbread house that tastes as great as it looks. (The VT staff couldn’t stop snacking on it when we tested the recipes.) The chalet featured on the following pages makes for a great craft project on a chilly weekend. And even the Grinchiest adults will admire—and want a taste of—your handiwork.
Chocolate-Espresso Gingerbread Dough
Makes 1 gingerbread house or 60 cookies
This dough is very stiff since it will need to be rolled out into large, stable sheets. When baked it gets
quite crisp, sort of a cross between a cracker and a cookie.
1 cup soy margarine, softened
2 cups sugar
1/2 cup dark molasses
1/4 cup unsweetened cocoa powder
2 Tbs. instant espresso powder
2 Tbs. ground ginger
1 Tbs. ground cinnamon
1 tsp. salt
1/2 tsp. ground cloves
4 3/4 cups all-purpose flour
1/4 cup soymilk or water
1/2 tsp. vanilla extract
1. Beat margarine and sugar 2 minutes at medium speed with electric mixer. Beat in molasses. Mix in cocoa powder, espresso powder, ginger, cinnamon, salt, and cloves on low speed. Increase speed to medium, and beat 1 minute, or until espresso dissolves.
ADVERTISEMENT
2. Beat in half of flour on low speed, then add soymilk and vanilla; beat until smooth. Beat in remaining flour until combined, then beat 30 seconds more on medium-low speed. Wrap in plastic wrap, and refrigerate 4 hours, or up to 2 days.
3. Let dough warm 10 minutes at room temperature, or until still firm in the center but yields to the touch at the edges. Cut dough in half. Place 1 dough half between 2 sheets of parchment paper, and roll to 16- x 12-inch inch rectangle that is about 1/8-inch thick. Repeat with remaining dough half. Without removing
parchment, slide dough rectangles onto baking sheets and refrigerate 30 minutes, or until firm.
4. Place 1 dough rectangle on work surface. Remove top sheet of parchment. Place templates on dough. (There is enough dough to cut out all the shapes without rerolling). Trace around templates with tip of small knife to cut out shapes. Transfer dough cutouts to parchment-lined baking sheet. Cut doors and windows from dough, if desired, and cut remaining dough into cookies. Chill 10 to 20 minutes, or until firm.
ADVERTISEMENT
5. Preheat oven to 325°F. Bake gingerbread cutouts 22 to 25 minutes, or until edges are firm. (The centers may still appear soft, but the cookies will harden as they cool.) Cool on baking sheet 20 minutes, then transfer to wire racks to cool completely. Trim uneven edges with serrated knife when just cooled.
Vegan Royal Icing
Royal icing is the glue that holds a gingerbread house together. It’s usually made with egg whites, which help it dry firm and strong enough to do its job. Thanks to a bit of xanthan gum, this egg-free version has good durability.
4 1⁄2 cups confectioners’ sugar
1 Tbs. cornstarch
1⁄2 tsp. xanthan gum
1 pinch salt
1. Combine all ingredients in bowl of electric mixer fitted with whisk attachment. Beat at low speed 1 minute, or until thoroughly combined. With mixer running, drizzle 1/3 cup water down side of bowl so it doesn’t splatter, slowly increasing mixer speed until sugar is incorporated. Beat at medium-high speed 2 minutes, scraping down sides of bowl as needed. The icing should be thick and stiff enough so that whisk attachment leaves ridges when drawn through.
ADVERTISEMENT
2. Scrape half of icing into medium pastry bag fitted with 1/4-inch or 1/8-inch round tip to use as glue for gingerbread house. For fine decorative work, switch to 1/16-inch tip. Cover surface of remaining icing with plastic wrap to prevent from drying out. Icing will stay pliable for several hours, and can be thinned with water, if necessary.
How to Assemble
You will need to cut the following templates out of parchment or paper. Use the templates to cut the gingerbread into the walls and roof of the chalet.
Side panels: 2 4- x 3-inch rectangles
Roof: 2 6 1/4- x 5-inch rectangles
Front and back: Starting from the bottom of an 8 1/2- x 11-inch piece of paper, draw two vertical 3-inch lines 7 inches apart. Mark a point halfway between the two lines (3 1/2 inches from either line) and 7 1/2 inches from bottom of the page. Draw diagonal lines from the top of each 3-inch line that meet at the point. Repeat to make second template.
Here’s a simple line drawing to help you out:

ADVERTISEMENT
Advice on how to put together your own vegan gingerbread house (and win the holidays) from Nicole Rees, the chalet’s designer:
- Gingerbread is a wonderful construction medium that allows infinite creativity. Sure, you can build a cathedral if you like, but if you’re new to the craft, keep it as simple as possible the first time. I’ve chosen a Swiss chalet not only because it’s seasonally appropriate, but because chalets are known for having overhanging eaves with lots of snow clinging to them, thus camouflaging any inadvertent overuse of Royal Icing to glue sections together. (It’s not that you’re not neat, it’s supposed to look snowy.)
- You’ll have more fun if you don’t expect the project to be completed in a specific time period, and this is a great project to do in stages, even stretched out over a few days.
- Think ahead and decide what you want to use as the foundation of your house. You can make a platform by covering foam core or a large wooden cutting board in foil. While you can use the icing as glue to stick the bottom of the house to a cake plate, I generally avoid the obvious danger of slick surfaces. For this small chalet, a 12-inch square board is plenty of room for both the chalet and some decorative tableau.
- The whole project relies on the icing drying out in order to hold the house together, so don’t attempt to assemble a gingerbread house on a humid day.
- Roll the dough as thinly as possible, preferably 3/16-inch thick. Because there are no eggs in the Royal Icing (egg proteins give icing more strength and dry firmer, allowing it to hold more weight) it’s essential to keep the structure as light as possible.
- Extra dough can be used to roll out trees, figures, reindeer, and other objects to make a more elaborate tableau.
- Keep the dough cold as you roll it out. It’s best to work with cold dough that just barely yields to the touch. Return it to the refrigerator if it begins to warm up.
- Roll the dough between sheets of parchment paper, repeatedly peel the paper away from the dough to make sure creases aren’t forming in the dough—crease-free dough is a stronger construction material.
- Return the cut pieces to the refrigerator before baking: cold dough will keep its shape better in the oven.
- If you notice any bowing or misshapen sides when the gingerbread pieces come out of the oven, trim them with a sharp, serrated knife once the cookies are set but not completely cool—about 15 minutes after coming out of the oven.
- You can cut out doors and windows before baking the dough, or you can draw them on the house with Royal Icing when you’re decorating.
- If you are ambitious, you can cut very small rectangles to create a balcony for your chalet. You’ll need a can or box to support the balcony until the Royal Icing is completely dry. Usually balconies that are less than an inch deep hold up fine.
RELATED: The Ultimate Holiday Baking Guide: 54 Cookie, Cake, and Pie Recipes for the Season
Get more of what you love from VT. Follow us on Instagram, Facebook, and Twitter and sign up for our email newsletters.